이전 포스팅에 이어, 모폴로지 연산의 열기(Open)와 닫기(Close)에 대해 알아보고자 합니다.
관련글
모폴로지 연산 – 열기&닫기
모폴로지 연산에서 침식은 노이즈를 제거할 수 있으나 객체의 형태도 깎이는 변형이 발생하고, 반대로 팽창은 객체 내부의 작은 구멍들을 메워주지만 객체의 형태가 팽창하며 노이즈도 진해집니다.
그러므로 노이즈가 많은 영상에서는 침식 연산 후 팽창 연산-열기; Open-을 하면 노이즈만 제거하는 효과 (객체가 깎인 형태에서 다시 팽창됨)를 얻을 수 있고, 반면 노이즈는 적지만 작은 구멍이 많은 영상에서는 팽창 연산 후 침식 연산-닫기; Close-을 하면 구멍을 메우는 효과 (객체가 팽창된 형태에서 다시 깎임)를 얻을 수 있습니다.
- 열기: 침식 → 팽창
- 닫기: 팽창 → 침식
범용 모폴로지 연산 함수
범용 모폴로지 연산함수 morphologyEx 는 이전 포스팅에서 소개한 erode/dilate 함수와 사용방법이 거의 유사합니다.
void morphologyEx(InputArray src, OutputArray dst, int op, InputArray kernel, Point anchor = Point(-1, -1),
int iterations = 1, int borderType = BORDER_CONSTANT,
const Scalar & boderValue = morphologyDefaultBorderValue())
- InputArray src: 입력 영상; 채널 수는 임의로 지정할 수 있으나 depth는 CV_8U, CV_16U, CV_16S, CV_32F, CV_64F 중 하나여야 함.
- OutputArray dst: 출력영상. 입력영상과 크기 및 타입 같음.
- int op: 모폴로지 연산 타입 (침식, 팽창, 열기, 닫기, 그래디언트, 탑햇, 블랙햇, 힛미스)
- InputArray kernel: structuring element; Mat()을 지정하면 $3 times 3$ 사이즈의 사각 element가 사용됨. getStructuringElement 를 사용할 수도 있음.
- Point anchor: element 내 앵커 위치로 기본값(-1, -1)은 앵커의 중심을 의미함.
- int iteration: 연산 반복 횟수.
- int borderType: 가장자리 픽셀의 extrapolation 메소드 타입 선택. (가장자리에 대한 연산 타입은 BORDER_CONSTANT, BORDER_REPLICATE 등이 있으며 BORDER_WRAP는 지원 안함)
- const Scalar & borderValue: 가장자리 픽셀 처리 방식이 BORDER_CONSTANT일 경우, 가장자리를 채울 값
노란색으로 마킹한 3번째 파라미터(int op)는 모폴로지 연산 타입을 선택하는 것인데요, 다음과 같이 8개의 옵션이 있습니다.
| Enumerator | Description |
| MORPH_ERODE | 침식 연산 |
| MORPH_DILATE | 팽창 연산 |
| MORPH_OPEN | 열기(Opening) 연산 $mathrm{dilate} (mathrm{erode}(texttt{src}, texttt{element}))$ |
| MORPH_CLOSE | 닫기(Closing) 연산 $mathrm{erode} (mathrm{dilate}(texttt{src}, texttt{element}))$ |
| MORPH_GRADIENT | 그래디언트 연산 – 경계값 검출 효과 $mathrm{dilate} (texttt{src}, texttt{element} )-mathrm{erode}(texttt{src}, texttt{element})$ |
| MORPH_TOPHAT | 탑햇 연산 – Open 연산을 통해 침식된 밝은 부분 검출 $texttt{src} – mathrm{open} (texttt{src}, texttt{element})$ |
| MORPH_BLACKHAT | 블랙햇 연산 – Close 연산을 통해 메워진 어두운 부분 검출 $mathrm{close}(texttt{src}, texttt{element})-texttt{src}$ |
| MORPH_HITMISS | Hit or Miss – structuring element와 비교하여 일치하는 패턴 찾기 * https://docs.opencv.org/master/db/d06/tutorial_hitOrMiss.html |
모폴로지 연산 적용 예제
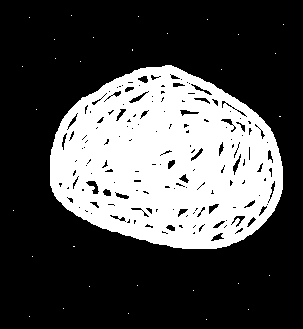
아래의 원본 영상에 모폴로지 연산을 적용해보도록 하겠습니다.

원본 영상
예제 코드
#include <iostream>
#include <opencv2/opencv.hpp>

using namespace std;
using namespace cv;

int main()
{
	Mat src = imread("paint.bmp", IMREAD_GRAYSCALE);
	if(src.empty())
	{
		cerr << "file error" << endl;
		return 1;
	}

	Mat element = getStructuringElement(MORPH_RECT, Size(5, 5));

	Mat dst_erode;
	morphologyEx(src, dst_erode, MORPH_ERODE, element);

	Mat dst_dilate;
	morphologyEx(src, dst_dilate, MORPH_DILATE, element);

	Mat dst_open;
	morphologyEx(src, dst_open, MORPH_OPEN, element);

	Mat dst_close;
	morphologyEx(src, dst_close, MORPH_CLOSE, element);

	Mat dst_gradient;
	morphologyEx(src, dst_gradient, MORPH_GRADIENT, element);

	Mat dst_tophat;
	morphologyEx(src, dst_tophat, MORPH_TOPHAT, element);

	Mat dst_blackhat;
	morphologyEx(src, dst_blackhat, MORPH_BLACKHAT, element);

	Mat dst_hitmiss;
	morphologyEx(src, dst_hitmiss, MORPH_HITMISS, element);


	imshow("src", src);
	imshow("erode", dst_erode);
	imshow("dilate", dst_dilate);
	imshow("open", dst_open);
	imshow("close", dst_close);
	imshow("gradient", dst_gradient);
	imshow("tophat", dst_tophat);
	imshow("blackhat", dst_blackhat);
	imshow("hitmiss", dst_hitmiss);

	waitKey();
	destroyAllWindows();

	return 0;
}
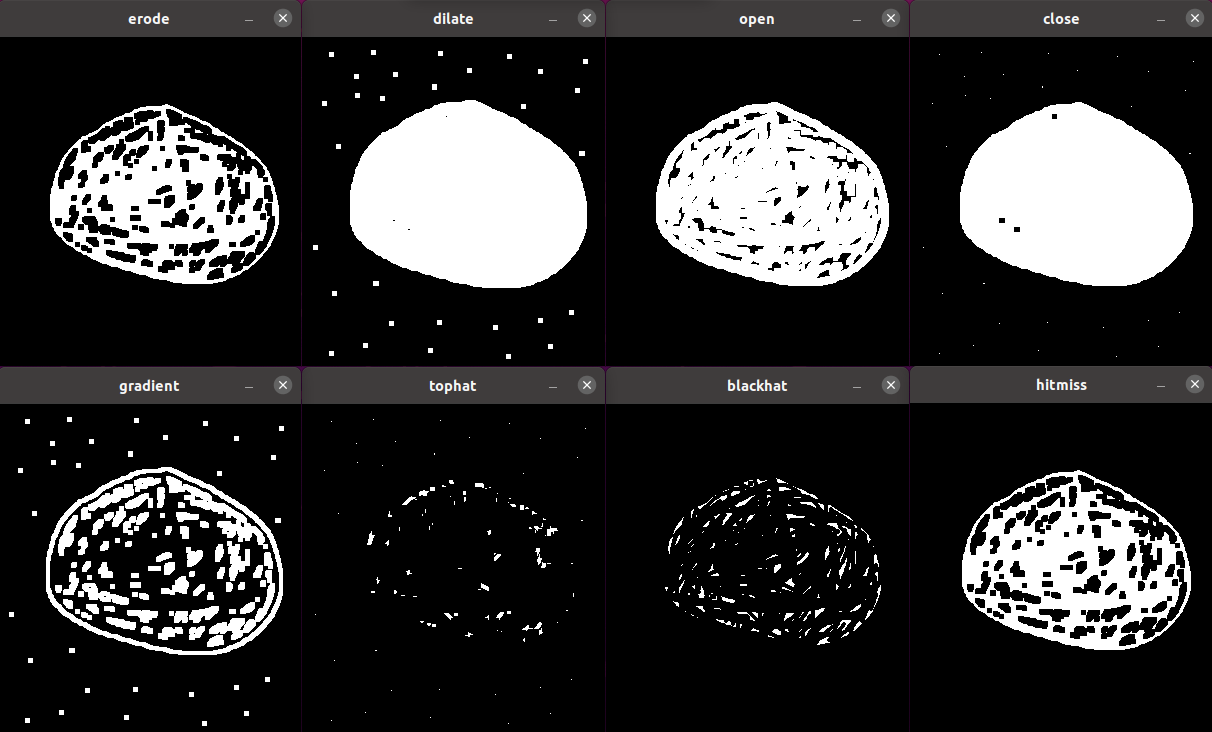
실행 결과

실행 결과
결과를 보면, 위에서 설명한 내용을 쉽게 이해할 수 있으리라 생각합니다. 영상의 특징 및 해결해야 할 문제가 무엇이냐에 따라, 적절한 모폴로지 연산을 선택해야 하고 structuring element의 속성도 적절히 선택해야 합니다. 그리고 비슷한 문제를 해결하기 위한 다른 방법, 더 좋은 방법들도 많답니다.
